¿Cómo cambiar el idioma de visualización en Microsoft Office?
Las aplicaciones de Microsoft Office son una de las más populares para fines de documentación. A veces, tiene varios usuarios que usan diferentes idiomas nativos en la misma computadora. Pueden preparar documentos o presentaciones o usar Outlook. Aunque las personas escriben en inglés, a muchos les resulta conveniente que los elementos del menú se muestren en su idioma nativo. Afortunadamente, Microsoft Office le permite cambiar el idioma de visualización para este propósito.
Relacionado: ¿Cómo cambiar el idioma en el navegador Google Chrome?
Paso 2: instalar el paquete de idioma de Office
- Idioma de visualización en Microsoft Office
- ¿Cómo cambiar el idioma de visualización en Microsoft Office?
Paso 1: Verificar disponibilidad Paquetes de idioma de OfficePaso 2: instalar el paquete de idioma de OfficePaso 3: cambiar el idioma de visualizaciónCorrección en diferentes idiomas
- Final Words
Paso 3: cambiar el idioma de visualización
Recuerde que el idioma de visualización es el que ve en todos los elementos del menú y el texto mostrar en su computadora. Sin embargo, el idioma de visualización de Windows y el idioma de Office son diferentes y funcionan de forma independiente. Esta es una gran ventaja, especialmente cuando ha comprado una computadora portátil en países como China con la versión china de Windows (no puede cambiar chino a inglés).
Por otro lado, también existe la desventaja de que debe cambiar el idioma de Office manualmente para alternar.
Corrección en diferentes idiomas
El proceso tiene tres pasos, aunque puede ignorar el segundo paso si tiene un paquete de idioma de Office existente instalado.
- Check available Office language packs
- Install additional language
- Change display and proofing language
Puede verificar y actualizar el idioma de visualización usando cualquiera de las aplicaciones de Office como Word, Excel, PowerPoint o Outlook. Los cambios en una aplicación afectarán a todas las aplicaciones de Office instaladas en su computadora. En este artículo, usaremos Microsoft Word y explicaremos cómo cambiar el idioma.
Comprobar los paquetes de idiomas de Office disponibles
- Launch Microsoft Word and open a blank document.
- Go to “File” menu and choose “Options”.
- Click on the “Language” tab to view available languages for your Office installation.
- Alternatively, go to “Review > Language” and select “Language Preferences…”.
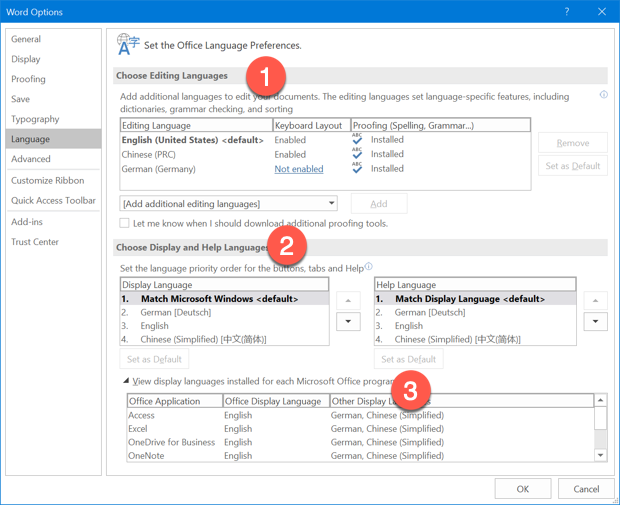
La sección «Idioma» contiene tres partes:
- Choose editing language – this is a language used for typing with keyboard and you have to add necessary keyboard input method in Windows for using the language in Office applications. In addition, you have to check the language has installation package for proofing spelling and grammar mistakes. Office allows you to add a new language in this section directly by selecting from the dropdown that shows “Add additional editing language”. However, it will just add the language to the list and show “Not Enabled” and “Not Installed”. You have to install Office language as explained in step2 and add input method in Windows. Choose the checkbox “Let me know when I should download addition proofing tools”, if you want Office to remind you when you process documents in different languages.
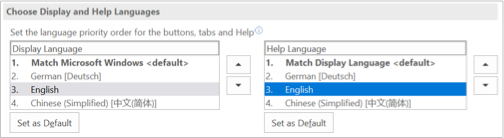
- Change display and help language – this is the display language we are explaining in this article. It will only affect the menu items and other relevant text display when you open Office applications. As you can see in the below screenshot, it is possible in Office to match the display language as Windows operating system language. In addition, you can make the display language as default for help language. This gives lot of flexibility in choosing the language for different display purposes.
- View all installed languages – list of available display languages for each Office application.
 Check Installed Languages in Options
Verifique si tiene instalado un paquete de idioma requerido y se muestra en las tres secciones. Si solo desea cambiar el idioma de visualización, es suficiente tener el idioma que aparece en la sección «Elegir idiomas de visualización y ayuda». Si tiene un paquete de idioma instalado, omita el paso 2 y continúe con el paso 3.
Instalar idioma adicional
Si no tiene el idioma en la lista, debe descargar e instalar el idioma requerido. Una vez más, nos gustaría recordarle que esto es diferente del idioma de visualización de Windows.
- Open official Microsoft Office page for language accessory pack.
- Scroll down to “Install the language accessory pack” section.
- Select the Office version 2010, 2013, 2016 or New versions. The new versions include Office 2019 and Microsoft 365 (earlier Office 365).
 Download Office Language Pack
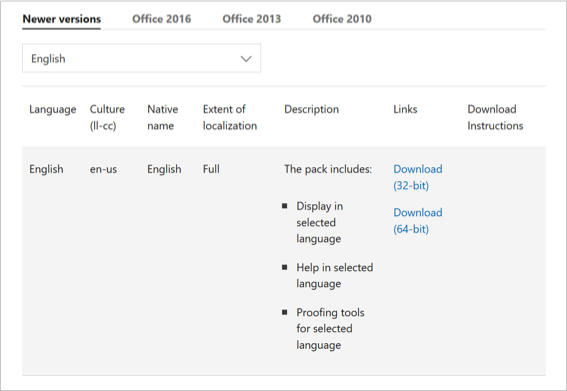
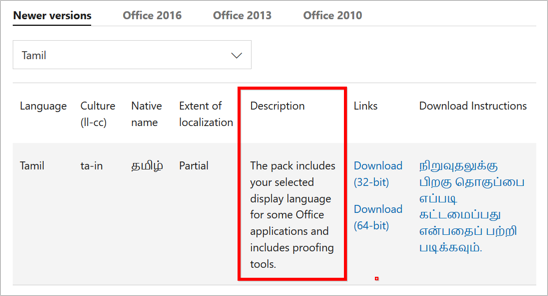
- Select the language from the dropdown and check under “Description” column. It should show the pack details whether the language includes display, help and proofing language. Not all languages will have all the options, for example below is an example showing only display and proofing are available. The “Download Instructions” explains further details like read the documentation after installation.
 Check Description Section
- After choosing the language, click on “Download (64-bit)” link. This is for the computers with 64-bit processor. If you are not sure your processor type, check this article to find whether it is 32-bit or 64-bit. All modern desktops and laptops should use 64-bit processor as 32-bit is obsolete.
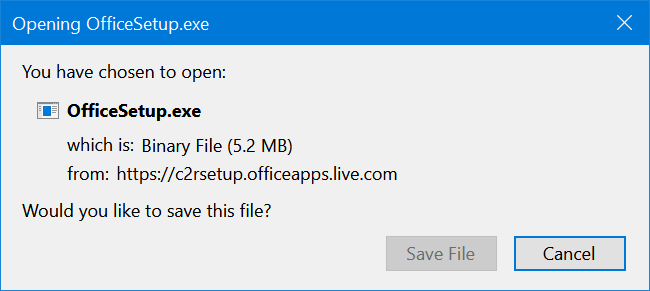
- It may take some time for the file to download. Depending upon the browser, you can either download the file or run directly.
 Download Office Language Pack Installation File
- If you have downloaded the file, start the installation process by double clicking on the “OfficeSetup.exe” file from your downloads folder.
Relacionado: ¿Cómo cambiar la entrada de idioma del teclado con métodos abreviados de teclado?
Cambiar el idioma de visualización y revisión
Después de instalar correctamente el paquete de idioma, inicie cualquier Aplicación de Office y vaya a la sección «Archivo > Opciones > Idioma» como se explica en setp1.
- You should see the installed language under “Choose Display and Help Languages” section.
 Set Display and Help Language
- Click on the language and click “Set as Default” button to make the language as default for your display or help.
- Alternatively, you can move the selected language up or down using the arrow buttons to change the priority. Office will use the priority from this list to decide which language to use for display and help. In the above screenshot example, Office will use Windows language as default then try German, English or Chinese. This is helpful when there I no sufficient help documents available in the default language.
Inicie Microsoft Word y abra un documento en blanco.
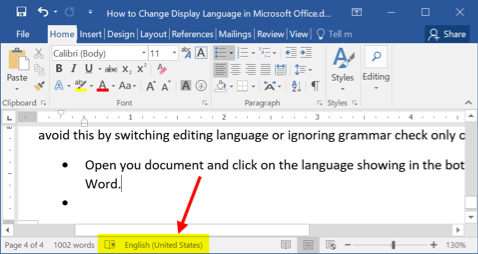
Recibimos documentos de autores ubicados en diferentes países. Word subrayará cada palabra en rojo cuando vea los documentos con una configuración de idioma diferente. Por ejemplo, todo el documento se subrayará cuando abra el idioma ruso con la pantalla en inglés. En algunos casos, es posible que también deba usar una sola palabra o frase en un idioma diferente sin mostrar errores gramaticales. Hay una solución rápida para evitar esto cambiando el idioma de edición o ignorando la revisión gramatical solo en ese documento.
- Open you document and click on the language showing in the bottom status bar in Word.
 Change Language Inside Word
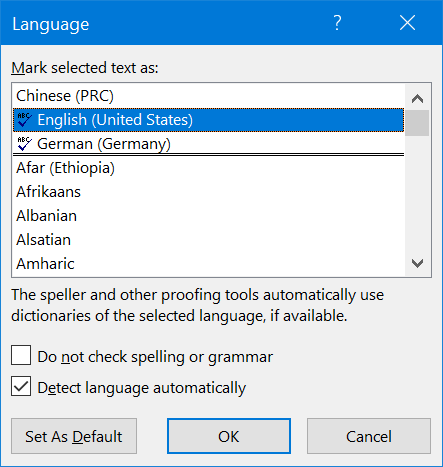
- If you do not see the language in the status bar, go to “Review > Language” and select “Set Proofing Language…”. You will see a small pop-up window to switch the language for that document.
 Quick Language Settings
- You have options to ignore spelling / grammar check, detect language automatically or change the default language.
Palabras finales
Esperamos que el contenido anterior lo ayude a comprender cómo cambiar los idiomas de visualización, edición y revisión en las aplicaciones de Office. Puede seguir el mismo proceso para configurar idiomas de derecha a izquierda como el árabe en Word.